
Dad passed on October 23, 2016 and Mom followed on April 13, 2025. Their request was to have their cremated remains spread on Emerald Island, North Carolina. However, local and state statues are such that depositing remais on land is highly regulated and pretty much prohibited. But, spreading them in the ocean is the way to go as long as you are 3 miles off the coast.
We selected October 23, 2025 to do this, but not all our family memebrs were able to travel to North Carolina for this event. We were able to hastely put together a Factime for Randy and Sarah. We also recorded the ceremony and we have it availabe here for you to view. There is also a link to downlaod the video if you chose to do that.
Click here to download a copy of this video to your local device.
Callsearch is the current replacment program for FCC Lookup. The current version is 7.4.9.5 It is functionally the same as FCC Lookup, but has been scaled down somewhat. The Ten-Ten lookup has been removed and replace with a lookup for GMRS call signs.
|
Here are the features: Standard Features
|
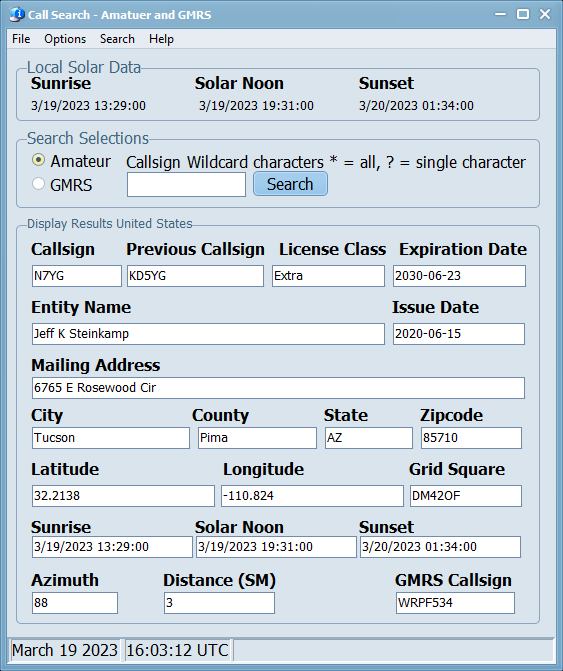 |
This software is built as a Win32 exectuable and will run on most Windows Platforms, 32 and 64 bit. Windows 7 could be problematic if you have not applied all of the mandator security updates and all the recommeded optional updates. It will also run on a Mac and Linux under the WINE emulator with the WINEPFX set for Windows 8 or later. FCCLookup users will find the loading and populating of the databases duirng the update process is much faster with this program. However, the process seem to be slower when running the program in the WINE Emulator.
There has been entirely too much disinformation and misinformation from our Government, the Media and our Social Networks that I decided that I need to to go to the horses mouth and see exactly what is what. The Center for Disease Control is charged with maintaining mortality statistic and is required to publish this data for public inspection. The CDC does a fantastic job of recording a multitude of data on every death that occurs in this country. But there is nothing that says they have to publish this in a user friendly format!! And I can certainty testify to that!!
Hamlib Testing Utility (Version 1.1.2.9 -- 9/17/2022)
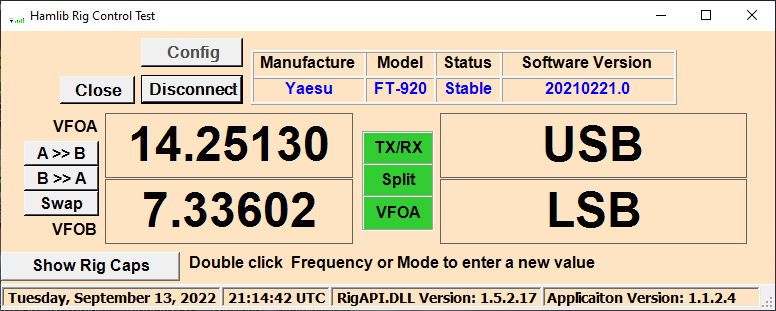
WARNING: This is alpha test software. It is not a full-fledged application, but rather a test platform for the Hamlib rig control daemon. At the present time there is NO error checking routines. The following assumptions are presumed: The radio is powered and turned on. The radio is correctly connected to the computer via the normal serial connection. The user has selected the correct radio in the configuration setting. This utility is a test platform for a library I am developing that will eventually replace the OmniRig library I am using in PSK Express and Digital Engine.
Icom Users: This software assumes the default CIV address for the radio. If you have changed the default address, then you will need to enter that address, in upper case, in the configuration, otherwise, leave it blank. If you have a radio, other than Icom that uses the CIV CAT protocol, then you will have to make sure your radio is using the default address. Let me know what that radio is so I can program for that in the future.
This software is based on a radio with more than 1 VFO. I do not believe there are any radios out there with a single VFO that has a CAT interface. I have attempted to program for that situation, but there is no guarantee that is going to work correctly. The VFO indicator will indicate which VFO is selected for receive. Due to the convoluted methods with Yaesu and Icom when it comes to VFO selection, no attempt has been made to select VFOs.
Installing the Software:
1. Download the software. Sicne this is not "known" software, your AV may hit on it so just allow it to download to your download folder.
2. Run the installer and let the program install. The default folder will be C:\Hamlib. DO NOT CHANGE this folder. Make sure you check the selection to add the icon to your desktop. When you reach the end, do not run the program just yet.
3. If you are running Malwarebytes on your computer, you will need to add a Folder exception for C:\Hamlib. Click on Setting, Allow List and add the folder to the exception list..
Using the Utility:
1. Launch the program from the dekstop icon.
2. Click on the Config button and select the radio, COM port, and the port speed you are using then click OK. (I have listed the common port speeds. If you are using an oddball port speed, you will have to reconfigure your radio for one of the common speeds. Anything greater than 19200 is overkill and a recipe for data loss, unless you have a high dollar shielded cable.)
3. Click the Connect button to start the utility. That button will then re-label to Disconnect and the Config button will be disabled.
The radio definitions box should populate with the Manufacture, Model, backend status and the backend version. After a couple of poll cycles, the VFO and Mode boxes should populate with the frequency and mode that is selected for the two VFOs. The polling cycle is 500 ms. During the even poll cycle, the A VFO is read along with the VFO and PTT status. During the odd poll cycle, the B VFO is read along with the SPLIT status.
To change a VFO frequency or Mode, double click inside the respective display and enter the frequency in MHz, or select the mode from the dropdown box. The modes in the box are the radio modes that are advertised in the backend software for the radio.
To write the frequency in VFOA to VFOB, click the A >> B button. Click the B >> A to write VFOB to VFOA.
To swap the VFO’s, click the Swap button.
Clicking the TX/RX button will set the radio into the transmit mode for those radio that support this function. Many Icom radios do not. The button will turn Red when the radio is in transmit mode.
The split button will turn Red anytime the radio is in split mode. Clicking the Split button will toggle the split mode. Currently, this utility will only toggle Split if VFOA is the receive VFO. Additional work is required for this function to work correctly when VFOB is selected as the receive VFO.
The VFO indicator will display which VFO is the receive VFO. Most Radio have their VFOs labeled as VFOA and VFOB. Some radio will advertise as MAIN and SUB.
The polling interval is hard set at 1000 ms (1 Second)
Scope:
This page details the user updates that will be requried to make 10 QSO Logger compatible with the new Weak Signal Event that will take effect starting in July 2021.
Purpose:
This step by step instruciton will guide the user on updting the Event Table to add in the Weak Signal Event and then update the Mode table to add the additional modes the user will require to support this new event, and any futne events.
Instructions:
Event Update Procedure:
|
Figure 1 |
Mode Update Procedure:
|
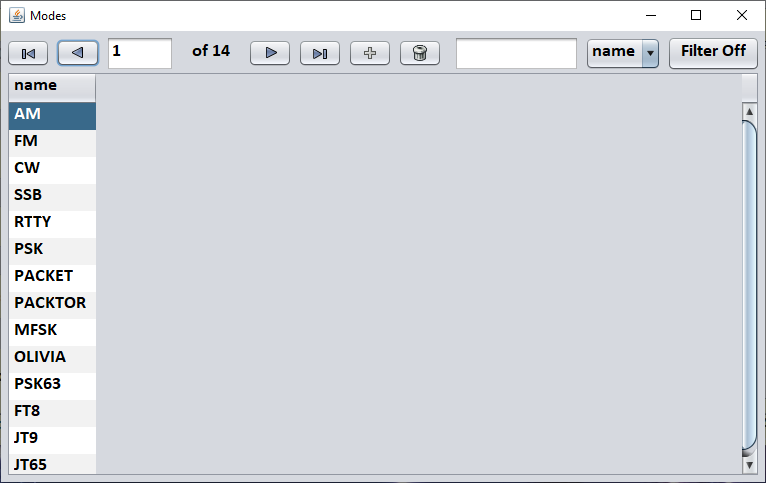
Figure 2 |

- You are here:
-
Home

- Uncategorised